Suspension Upgrade
 Lucy-Jo is currently equipped with Rocky Mountain Parabolic Suspension Springs & Old Man Emu Shock Absorbers.
My original semi-elliptic suspension springs weren't too badly corroded and the leafs weren't spreading too badly, but after taking a hammering off road it became noticable that the vehicle was sitting low at the back. I decided to replace all four suspension springs with parabolic springs.
I took advice and considered a number of different manufacturers of parabolic suspension springs before deciding to fit Rocky Mountain parabolic suspension springs. I placed an order for all the parts I needed, but unfortunately the company that were at that time importing Rocky Mountain parts appeared to have some cash flow difficulties and were unable to fulfill my order. Instead Simmonites attempted to fulfill the order. I won't risk making libellous comments here, suffice to say that I will never ever again order anything from Simmonites. I have nothing but scorn for the company and I would dearly love to see it wither and die with large debts. Now I've got that off my chest....
Eventually, I received my order for Rocky Mountain 2 leaf parabolic suspension springs for the front and rear, new U-bolts, spring bolts, shackles, chassis bushes and Old Man Emu shock absorbers. Over the course of a weekend, my mate Eddie and I fitted them.
I subsequently fitted a roofrack and started to tow my caravan, so I decided I wanted to upgrade to heavier duty 3 leaf parabolic suspension springs at the back of my Land-Rover. I've fitted those and am pleased with them.
If you fit parabolic springs, you should be aware that because the individual leaves are seperated there is little friction between the leaves unlike on the standard semi-elliptic springs. The friction has a damping effect, so when you upgrade the springs you should also upgrade the shock absorber to ones with more damping, preferably ones recommended for use with you particular springs.
Shortly after originally fitting the 2 leaf parabolic springs, I wrote an article for the Series 3 Owners Club magazine about doing this. The following is based on what I wrote:-
Replacing Suspension Springs
Having recently fitted two sets of parabolic springs to two different Land-Rovers (my own 88" and a friends Stage 1 V8) it was suggested to me by Ray Wood of Rocky Mountain in Canada that I should write and article about it for The Magazine (That's the name of the S3OC's monthly newsletter). I hope that the following comments are helpful to someone out there who is contemplating replacing their suspension springs - parabolic or semi-elliptic.
It took two people (plus tea makers and onlookers!) a whole Sunday to change four springs. We did have breaks, but allow yourself plenty of time. Be prepared to ache the following day!
Replace the rear springs before the front ones. If you only manage to finish changing the rear springs and not the fronts the vehicle is still driveable, whereas if you change the fronts and not the rears your headlights will be pointing high and will dazzle other drivers. (Even if you are not fitting parabolics, presumably the springs you are replacing are sagging and the new springs will lift the vehicle higher).
Ask the spring suppliers to fit the spring bushes for you. The bushes need to be pressed into position, which is difficult to do at home. Poly bushes can be doubly difficult to fit at home. Many suppliers supply the springs with the bushes fitted as a matter of course.
Put easing oil (WD40) on all the nuts and bolts that you will be undoing a few days before you come to do the work. Inevitably, bolts that have not been undone for years can be tight, so do everything you can do to make them easier to undo.
The following tools are what we needed:-
- Socket set
- Deep sockets
- Breaking bar
- Ring Spanners
- Open ended spanners
- Axle stands (minimum 2)
- Jacks (trolley/bottle/high-lift)(minimim 2)
- Torque wrench
- Universal Spanner (a.k.a. Angle grinder) and disk (and personal protection equipment)
- Hack saws and blades
- Large flat head screwdriver
- Land-Rover special tool number one (a large hammer/mallet) and drift (old bolt?)
- Drill and drill bits
It's also worth having the following parts available:-
- New springs (duh!) with bushes fitted
- 8 new U-bolts and nuts of appropriate sizes
- 8 or 12 new spring bolts and nuts of appropriate sizes
- Some washers that fit U-bolts and spring bolts
- Set of new spring shackles - unfortunately front/rear and inside/outside are all different
- 4 replacement chassis bushes (2 front and 2 rear)
- 2 extended brake hoses for front axle
- 4 extended shock absorbers
- 2 extra long axle check straps
- Shock absorber mounting plates for front shock absorbers - see comment later
The steps for replacing the rear springs are as follows. The fronts are the same with obvious differences.
Park on firm, flat, level ground. Apply the handbrake and put into first gear low ratio (four wheel drive). Chock in front of and behind the front wheels.
Loosen the wheel nuts on the rear wheels, but don't remove them yet. Since I wrote this, I have had experience of changing springs leaving the wheels on. I am not convinced that leaving the wheels on is easier, although it does have some advantages. Make up your own mind on this!
Before you start, it is worth going around the vehicle and slackening off slightly the nuts on any spring bolts that you are going to have to undo later.
Jack the rear of the vehicle up and prop it on axle stands supporting the chassis. Prop it as high as you sensibly safely can under the rear cross member and/or under the chassis rails. The higher you prop the bodywork, the easier it is to align parts and the more room you have to work with spanners and wrenches. You will need a lot of space to waggle the springs about to align the bolts with the holes. You are going to be spending a lot of time under the vehicle, so unless you are agile, it's much more comfortable to have it really high. However, don't prop the vehicle so high that it becomes dangerous! If your axle stands don't go high enough, then you might consider using some sturdy chunks of wood. Please be careful that the wood you use is not at risk of splitting! I don't want you to have any accidents (unlesss you are one of those people I believe to be of doubtful parentage who works at Simmonites - in which case a 50T HGV falling on top of you from a very great height is too good for you!) We used a stack of old wheels we had lying around.
Remove the rear wheels.
Undo the nuts on one pair of U-bolts. Only work on one spring at a time.
Jack up the axle adjacent to the spring you are removing. Jack up until the axle and spring come apart. A few gentle taps with LR tool #1 might help. The parts may be stuck together a bit, so it may all come apart suddenly with a bit of a bang. If it does, you'll realise why you propped the vehicle so carefully.
Prop the axle so that it is clear of the spring. You don't want any weight on the spring because it is then transferred to the spring shackle bolts in shear which makes them more difficult to turn. They can be tight enough to burst sockets even without this extra load on them (ask me how I know!).
Put a ring spanner onto the bolt head of the bolt that passes through the bottom of the shackle and spring (that is the lower of the two bolts that is at the back end of the spring). Do not try to endo this bolt yet. The shackle plate is threaded in the section adjacent to the nut with the nut acting as a locknut against the threaded part of the shackle. You will not be able to undo the bolt until this nut is loosened. Use a breaking bar (and lots of naughty swear words) to undo the nut and then the bolt.
Ensure that the spring is supported so that when you remove the bolt the spring will not come crashing down. Leave both spring bolts in place until you have loosened them both. If one is still tight and the other is completely removed you just end up waggling the spring about in the air rather than loosening the bolt (which can be frustrating!). Leaving the bolt in place restrains the tip of the spring and so it doesn't waggle as much as you struggle with that tight bolt.
Are you still reading this? Aren't you bored yet? There should be a prize for anyone who reads this far! I was hoping to sell this page as a cure for insomnia!
If a nut won't budge, then you will have to "undo" it with the "universal spanner" (the angle grinder! <Grin>. There is a threaded section in some of the shackle plates next to the nuts. If you grind the head of the bolt away so that you can't turn the bolt then you will make it exceedingly difficult to extract the section of bolt threaded into the shackle plate. If you do have to grind anything, try to leave the bolt head alone so that you can still turn the bolt to extract it from the threaded section of the shackle. Otherwise you have to resort to grinding away the shackle and possibly then the chassis!
If you have managed to remove the nut from from a bolt which doesn't have threaded shackle plates but are unable to persuade the bolt to come out of the shackle plate by drifting or turning it you can extract it by grinding of the bolt head, packing lots of washers onto the threaded end and then tighten a nut against the washers. This will hopefully draw the remains of the bolt head through the shackle plate.
Careful with the springs - they are suprisingly heavy and painful if dropped on limbs (again - ask me how I know!).
We didn't have to replace any chassis bushes, which was fortunate as this job has a reputation for being an awkward one. If you do need to replace chassis bushes I recommend you borrow, beg, steal, or build a tool called a bush whacker which applies large forces to extract the bushes without you having to bludgeon way at them.
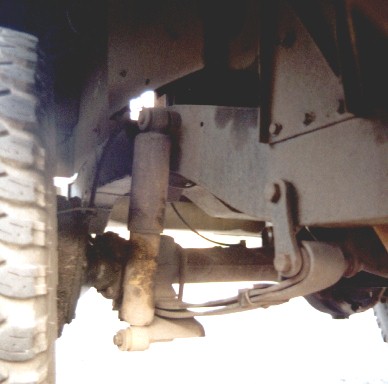
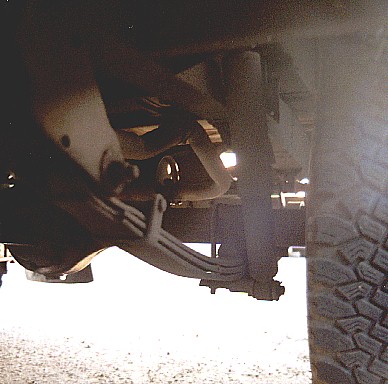
The shock absorbers are easy to replace. Simply undo the bolts or split pins at both ends and remove the damper. They aren't usually too rusted into place. If you are fitting parabolic springs then you might need shocks with extra travel to prevent them bottoming out on full rebound.
Apparently on some older Land-Rovers larger diameter shocks won't fit on the front axle without modifications to the bottom clamping plate on which the lower end of the shocks mount. I've not encountered this problem, but if you do you either need to weild that welding gear or swap the clamping plates for later items.
Another potential problem is that the new U-bolts may have a lightly larger diameter section than the old ones. You might need to drill out the holes in the clamping plates to accomodate the larger U-bolts. Again, I've not seen this problem, only heard about it.
When fitting the new springs, make sure you fit the right ones! Some parabolic (and all semi-elliptic) springs are handed for offside/nearside of the vehicle. I am not aware of any springs which have a front/rear end though once you've established which side and end of the vehicle it goes on! If you can't suss out which way up the springs go, then you shouldn't have started the job. In fact you are sufficiently stupid that perhaps you should consider getting a job working at Simmonites.
You need to align the hole in the underside of the axle with the aligning bolt through the middle of the spring. This can be difficult especially if the spring is already mounted onto the chassis, which is why I recommend you bolt the spring to the axle with the U-bolts before fixing the spring to the chassis.
Don't torque up any bolts yet.
You might need to slacken off the top bolts through the shackle where the chassis bushes go. Releasing these allows the shackles to dangle freely making it much easier to align the spring eye with the shackle. In any case, you really should re-set the chassis bushes at the end of the job for which you will neeed to slacken the top bolt through the shackle.
Make sure that you torque the U-bolts to 70 lbs.ft and check them after 100 miles. If the U-bolts ever work loose, the bending stresses in the spring concentrate around the bolt hole in the middle of the spring which has been know to permanently bend the spring in the middle. Cheap and nasty U-bolts have a habit of stretching after a few miles of driving so they will keep on working loose.
Axle check straps should be fitted so that the shock absorbers can't bottom out. Allow for a little stretch. Before you tighten up any of the spring bolts, put some weight in the vehicle (people, tools, gold ingots, whatever you've got to hand), or jack the spring towards the chassis somehow. Then tighten all the spring bolts to 70 lbs.ft. This ensure that the rubber in the bushes is in a neutral position when the suspension is at around mid-height. Failure to do this could cause the rubber bushes to tear when the suspension is on full bump or full rebound.
What's the ride like on the parabolics?
I found the improvement in ride on my 88" was immediately obvious (but don't forget that I'm comparing tired old springs with brand new, so the comparison is not totally fair). I believe the springs became more supple after a couple of weeks so the ride improved further. The slight lift makes the vehicle look good too.
Overall, in my opinion, the ride on parabolic springs is better than on semi-elliptic springs, especially once the semi-elliptic springs have rusted and seized up a little, which they will do far more quickly than parabolics. However, on the down side, parabolic springs are about three times the price of semi-elliptics.
Please be very careful if you do any work on your Land-Rover, particularly if the work involves jacking and propping the vehicle. If you can't work safely, then please leave the work to someone who can.